Did you know that you can install WordPress on your own computer without going with any hosting?
of course, it's possible, this tutorial guide you how to install WordPress locally. So you would be installed and test all the themes, plugins on your computer itself!
Besides the WordPress, there are so many free and open source CMS are available. Why people go only with WordPress It is one question. WordPress support more than 54,545 plugins, It has thousands of free themes. Plugins have the pre-built code.
To Install WordPress, We required a web server. I am demonstrating with most popular cross-platform XAMPP server. XAMPP is one solution to run your web services.
Also must Read part one of this tutorial - How to Install XAMPP step by step If you installed XAMPP already, let's move forward.
Also must Read part one of this tutorial - How to Install XAMPP step by step If you installed XAMPP already, let's move forward.
How to Installed WordPress on Localhost step by step?
If you are new to the WordPress, this is the only best choice to learn without any cost.
Here step by step guide assist you to install WordPress on your localhost easily.
Step #1 Download WordPress
Open any browser and enter www.wordpress.org an official WordPress website. You will get a window shown below.
Click on download WordPress button which at top of the right corner.
A new window will open, touch on download WordPress 4.9.4 It will download a zip file. The file size is less than 10mb which marks WordPress is lightweight.
Extract the downloaded zip file.
Step #2 Move WordPress Folder into Root Directory
Next, you need to copy/move the previous unzip WordPress folder and paste inside xampp under the folder called htdocs - root directory for apache server.
Ex. C:\\program files\xampp\htdocs
I recommended you to rename your WordPress folder to your site name. I rename it as 'mysite'. Remember the name we require it while configuration.
Step #3 Create New Database
For storing WordPress files, You need to create a new database for WordPress.
Enter URL localhost/phpmyadmin and click on Databases to create a new database. Provide relevant name for database. You can be give anything. I'm creating the database with name forgeeky then click on create button.
Step #4 Run WordPress Installer
Now run the WordPress installer wizard. Enter localhost/mysite. localhost/NAME_OF_YOUR_FOLDER in browser URL address. You can observe screenshot. Select language and then click on "Lets'Go" option to continue the process.
Step #5 Apply Configuration
Next, WordPress configuration window will open
Enter the details as provided
- Database Name: Name of the database created in PHPMyAdmin (forgeeky)
- username: root
- password: leave blank
- Database Host: Keep as default (localhost)
- Table Prefix: Keep as default (wp_)
Submit the details
Step #6 Install WordPress
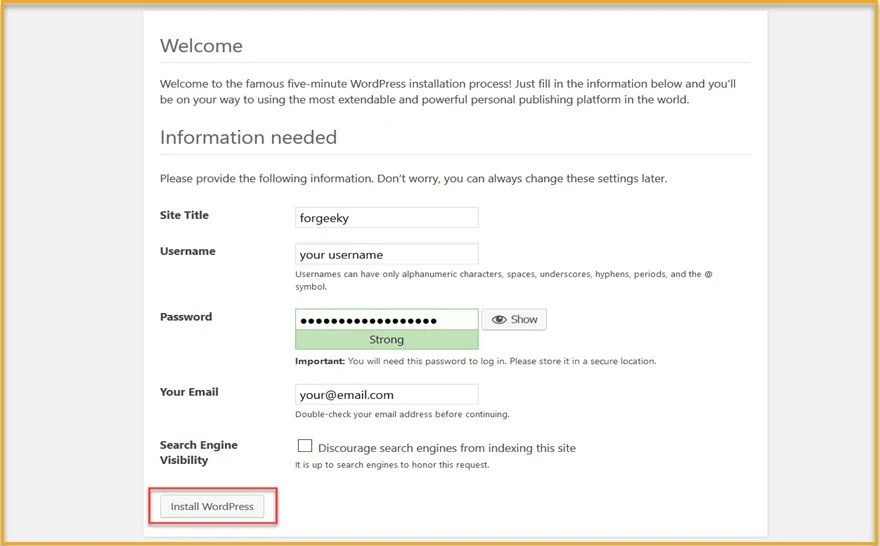
Now on next screen add desired site title, username, password, and email. Click on Install WordPress button. As we are working on Local Environment, search engine visibility will no matter here.
Step #6 Install WordPress
Now on next screen add desired site title, username, password, and email. Click on Install WordPress button. As we are working on Local Environment, search engine visibility will no matter here.
Remember the username and password, It will ask each when you want to open dashboard.
Now, you completed the installation process. One success window will open. Log in by entering your previous entered credential. It will redirect you to WordPress dashboard.
Step #8 Setup manual config in wp-config
Open the wp-config.php file. It available inside the folder htdocs/folder - where WordPress files you kept. And apply the configuration mentioned in step #5.
Bingo! You have installed WordPress on the local server using XAMPP. Try to create your stunning site on WordPress. XAMPP is a cross platform tool and widely used by programmers. You can find complete step by step guide here How to install XAMPP.
If you find any issues or stuck anywhere with installing the WordPress using XAMPP, let me know in comment section.


No comments